

If you are surfing the internet for the procedure to create an invoice, then your search ends here. Creation of an invoice in QuickBooks by Zintego is relatively easy and profoundly depends on the service type corresponding to your client. In this context, users can use different methodologies to create an invoice: fixed price, simple price, initial cost and time, etc. After reading this entire article, you will be familiarize with the easy steps to create an Invoice in QuickBooks desktop.
Although this easy-to-comprehend article should be enough for you, if you feel the need for help on any technical hurdle, you can call our team. With years of experience and vast experience, our professionals will get all of your QuickBooks issues root out.
Procedure for creating Invoice in QuickBooks Desktop
QuickBooks Desktop allows users to create invoices using three different methods. These include:
- Invoice without sales order
- invoice from sales order
- Invoice from estimate
1st Method: Invoice without Sales Order
Creating an invoice without a sales order requires the user to follow the steps below.
- The user needs to first head to Create Invoices option.

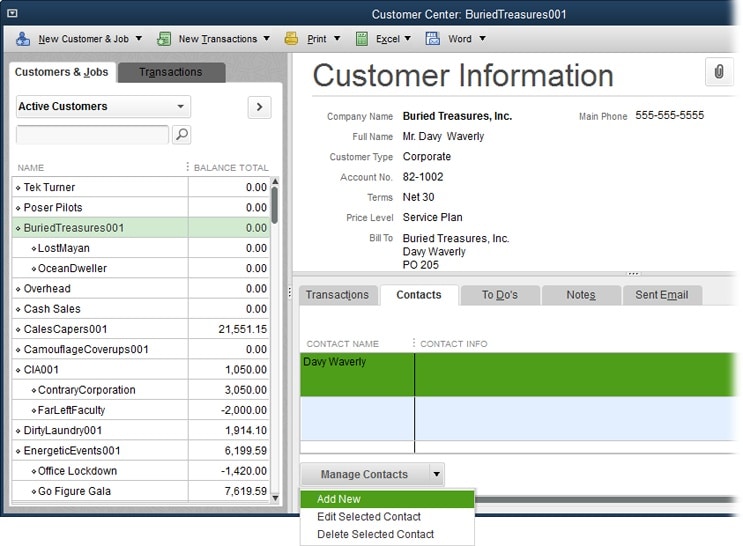
- Next, select the customer and job options from the Customer: Job dropdown menu. To add a new client or job, use the Add New option from the dropdown menu. After adding and saving the customer and work information, continue with invoice generation.
- You can create a variety of invoice formats by using customized templates for various customer types and business divisions. Before moving on with the invoice, select the correct template.
- After that, include the fields below in your invoice:
1.1 Method
- Date: QuickBooks typically sets the date to the current date. Make sure the date corresponds to the one you want on your invoice by double-checking it.
- The invoice number is generate automatically by QuickBooks Desktop. However, you can also make a manual change. If you use a previously used number, a pop-up dialogue box will appear, warning you that you are using a duplicate number.
- Bill to, Ship to: These fields are fill with information from QuickBooks Desktop for the customer you are charging. You can make manual changes to the invoice if it needs to go to a different address.
- P.O.: If a client requests it, include their purchase order (P.O.) number on your bills. That information can be manually enter here.
- Payment Terms: You must select the proper payment terms based on your cash flow. This will determine how long your client has to pay the invoice.
- Rep, Ship, Via, and F.O.B. are only chosen by selected businesses. The Rep field designates the sales representative in charge of customer sales. The delivery date is indicate by the phrase Ship. Freight on board (F.O.B.) designates the owner of the cargo throughout the product’s transit phase and Via denotes the mode of distribution.
1.2 Method
- You are now need to enter the information for your customers’ purchases of the products.
- Add time/costs: You can have the invoice automatically filled up by selecting this icon while adding billable time to QuickBooks Desktop.
- Quantity, item code, description, price per item, class, and amount can all be enter manually. You can skip inputting a lot of information if the products are prepare by selecting the item code for those products. The fields Quantity, Description, Price each, and Class all support manual editing.
- Taxes: QuickBooks Desktop gives you the option to select the appropriate sales tax rate for each line item on the invoice. Select the precise sales tax code in the Tax column of the invoice.
- Customer message and memo: It is possible to pre-create the customer message box. You can even insert a customer-based message on the invoice. The Memo field on each invoice is manually create.
- Client tax code: Just as different products include tax at different rates, a customer could experience issues while trying to pay a specific sales tax. The most prevalent is an exemption from sales tax. The menu has the proper tax code. This setting will have an impact on the entire invoice. If the code isn’t already in QuickBooks Desktop, you may manually add it by selecting Add New from the dropdown menu.
- Tax: The tax field is where the tax rate for the invoice is enter. It can be chosen from the dropdown menu.
2nd Method: Creating an invoice from a sales order
To create an invoice in QuickBooks Desktop from a sales order, follow the procedures listed below:
- Choose Sales Orders from the main screen.
- Use the search button to find the sales order you want to create an invoice for in the Sales Order form, and then tap the Create Invoice icon.
- You can choose to produce invoices for a selection of products or for all of your sales orders. Afterward, click Ok.
- If you select to create an invoice for specific goods, a new pop-up window allowing you to do so will emerge. Select the appropriate option and then click Ok.
- Proceed to the bill screen after that. It is now possible to send and update the invoice.
3rd Method: Creating an invoice from an estimate
An invoice created from an estimate resembles one created from a sales order quite a bit.
- To begin, click on the Estimates icon.
- When using sales orders, submit an invoice for a number of sales orders. Users can produce one invoice per estimate.
- Users will have the ability to decide how much of the estimate they wish to bill on this particular invoice if progress invoicing is being use. A you use similar process is to decide which sales order items to include on an invoice.
By this stage, you should have gone through all the different methods to create an invoice in QuickBooks Desktop, and we hope that the contents of this article helped you in the creation of an invoice in QuickBooks. For additional information, you can communicate with our QuickBooks experts team at the helpline 1 800 761 1787.